How to clean DSLR camera 2023 – A Comprehensive Guide
One DSLR camera is often used for a long time, after using the dust and dirt will accumulate in the lens. How to clean it?
Let’s see today.

1. The lens cap is never used to cover the mirror and objective exposure to prevent dust from entering.
If it is necessary, you can try to use lens tissue with pure alcohol or cleaning fluid on the mirror body wipe clean or brush on both sides of the lens solution. The main thing is not too hard brushing on the lens, especially some high-index lenses may be easy to damage!
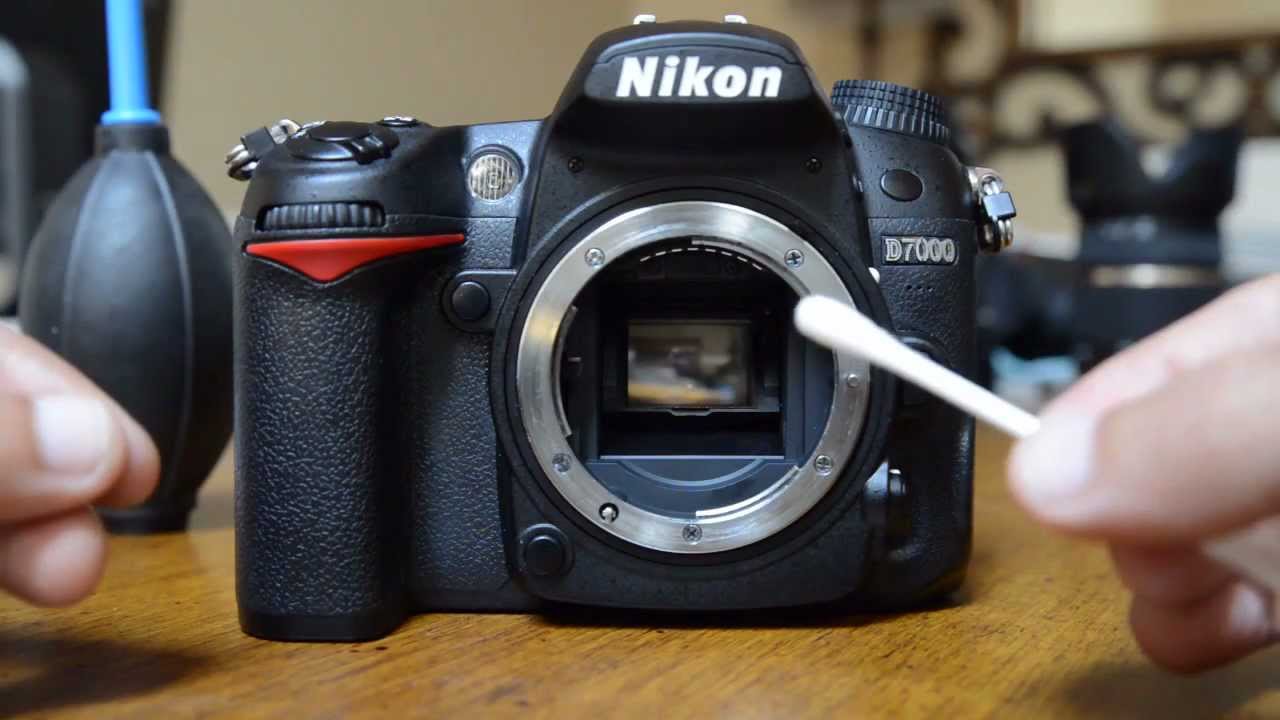
2. If there are spots on the picture, you can try to use a blower brush (with gas) to blow out all corners of the camera body; then wipe it gently with a cotton swab (especially between glass), while avoiding excess force against the glass. When using household detergents, they must be used with caution. There is a risk of dissolving the glue that attaches the glass lens to the mirror coating.
3. If there is dirt on the mirror or sensor surface, you can use a blower brush (with gas) to blow off all corners of the camera body; then gently wipe it with a cotton swab (especially between glass), while avoiding excess force against the glass. It should be noted that when using detergents at home, there is a need for caution. There is a risk of dissolving the adhesive that attaches the glass lens to the mirror coating. Don’t forget to turn off your camera power switch before cleaning and remove your battery!
4. Do not use a dry cloth or tissue, toothpaste, and other abrasives to wipe the lens surface. Remember that if you use too much force, you could damage your camera!
5. Don’t give up oil with vinegar to remove stubborn stains on the mirror. Be sure to use old clothes or newspapers to protect the floor before moving it forward, then hold down one end of the wet paper towels (or soaked with vinegar) on the mirror surface, and gently wipe the stains off along with the towel. If there is any water left behind after wiping it out carefully with tissues or cotton swabs; remember not to store your camera at this time! Wait for it to completely dry first before turning on the power. For stubborn dirt, spots can be removed by gentle brushing with a soft brush (eg, toothbrush).
6. If you drop your camera into water or other liquids, you must remove the battery and card! The next step is to wipe it gently and slowly with a dry cloth (tissue) and then turn on the power to see if there is an anomaly. If everything seems fine, you can open the camera and use cotton swabs dipped in methyl alcohol or special cleaning fluid for DSLR cameras that I’ve previously introduced; then let it air dry before putting back the parts. But never use inflammable solvents such as petrol products to clean your camera!
7. Once every three months, you can put a few drops of pure oil (such as machine oil for precision instruments) on the camera’s drive motor shaft (usually located around the shutter button). But before using, you should check your owner manual for oil-inhibiting tricks; otherwise, your camera will be broken!
8. After shooting for a while, you can also use a blower brush (with gas) to blow off all corners of the camera body; then gently wipe it with a cotton swab (especially between glass), while avoiding excess force against the glass. It should be noted that when using detergents at home, there is a need for caution. If necessary, clean up dust or soil on the sensor by using special tools designed for DSLR cameras! Remember not to touch it again after cleaning, so as not to leave dirty fingerprints or induce scratches on the sensor!
9. You can also use some video head cleaning fluid to clean your camera’s CCD, CMOS, and other heads; but before using it, please be sure you know how to use it safely and ask the store clerk for detailed instructions if necessary. Never touch the head directly with your fingers or any other tools!
10, if there is any scratch on the lens surface after using a blower brush (with gas) to blow off all corners of the camera body; then gently wipe it with a cotton swab (especially between glass), while avoiding excess force against the glass. It should be noted that when using detergents, there is a need for caution. Be sure not to leave dirty fingerprints or induce scratches on the lens surface; otherwise, your expensive glass lens will be broken!
11, remember that wherever you go and whatever style of shooting, you should always protect your camera from dust and humidity (eg by using a neck strap cover); especially when storing it in dusty and humid places such as at home or outdoors. However, there is still an extra precaution needed: check your owner manual for how to remove dust&humidity inside your camera because every brand has different methods!
12, don’t give up oil with vinegar to remove stubborn stains on the mirror. After each cleaning, please put back all parts into their original position before closing down the camera body. Finally, if everything’s OK, you can turn on the power and shoot; but remember not to expose it for too long because the humidity may cause condensation!
13, if your camera often malfunctions, you can use a cotton swab dipped in methyl alcohol or special cleaning fluid for DSLR cameras that I’ve previously introduced to remove all dirt inside your camera body. For stubborn dirt, spots can be removed by gentle brushing with a soft brush (eg toothbrush). If there is any water left behind after wiping it out carefully with tissues or cotton swabs; remember not to store your camera at this time! Wait for it to completely dry first before turning on the power.
14, sometimes dust enters into the lens from the outside through the gaps between lenses, thus affecting the quality of shooting! Fortunately, most DSLR cameras have a dust reduction function. If your camera is so equipped, please refer to your owner manual for how to activate this function before turning fingers at it.
15, if you are too lazy to clean up or don’t know how to do it yourself; you can always leave it to the professionals! As long as your camera is still in the warranty period, taking it to a professional who specializes in cleaning lenses and camera sensors should be no problem! They usually work with special tools that produce high-frequency sound waves (sonic waves) that help blow away tiny dust particles on the mirror surface. However, when buying one of these machines for yourself; make sure its power supply voltage matches yours.
16, avoid using a hairdryer to blow the dust off the camera body because the air stream produced by a hairdryer is too strong and can cause damage to fragile parts inside your DSLR! The temperature of the hot air may also be too high, causing the metal on DSLR’s shutters to melt or warp as well as damaging other plastic surfaces. In addition, don’t use it for too long because excessive heat may cause condensation inside your camera!
Summary:
√ Cleaning liquid should NOT be directly sprayed onto any waterproof lens surfaces or sensors.
√ The liquid-covered sensor MUST be carefully wiped clean with a blower brush (using gas) after first turning off the power supply and disconnecting any cables. Then the surface should be wiped with a soft tissue until no liquid is visible anymore before being placed in a dust-free environment for further storage.
√ Please refer to your owner’s manual for how to clean your camera, because every brand has different instructions!
FAQs
Q1. What are the factors that affect the cost of professional cleaning?
A1. The price is mainly determined by the number of parts to be cleaned, over/under exposure, dirt depth, and if dust is inside the LCD screen too, etc.
Q2. How many times can I clean my camera for free after purchasing a waterproof lens with a “waterproof” feature?
A2: Generally speaking, you can clean your waterproof lens 5-6 times with alcohol wipes before having to pay for professional cleaning fees again.
Q3. Why are my pictures not as sharp as before after I have sent it in for professional cleaning?
A3: If your pictures turn out less sharp after having it professionally cleaned, please check if your camera body is still in good condition and has no faulty connections. Another reason would be the lens: if it is covered with dust particles, there will definitely be distortion and blurriness!
![How To Reset Ring Floodlight Camera [Detailed Guide 2023]](https://cameraslife.com/wp-content/uploads/2022/10/website-image-5-1-768x402.webp)
![When Were Security Cameras Invented – CCTV History [2023]](https://cameraslife.com/wp-content/uploads/2022/10/website-image-1-2-768x402.webp)


![How To Install, Set Up, Charge and Reset Arlo Pro 3 Floodlight Camera? [Guide 2023]](https://cameraslife.com/wp-content/uploads/2022/11/website-image-2-768x402.png)