How to use a Tripod for Camera 2023 – A Complete Step By Step Guide
One of the most important accessories a photographer can have is a tripod. It provides a stable platform for your camera to take pictures in low light, long exposures, and self-portraits. If you are going to be taking pictures outdoors at night – astrophotography – a sturdy tripod is almost a necessity because it holds the camera steady, making it easier to take long exposures without creating a camera shake in the image.
Related: 3 Camera Interview Setup – A Complete Guide about 3 Camera Interview Setup
A tripod is also very handy when you need to make repeated shots with exactly the same framing, either for HDR images or product photography. Some tripods allow you to flip the center column around so that it is pointing downwards. You can then use your tripod as a makeshift light stand and position a flashgun as low as possible.
How to Choose a Tripod?
There are lots of different types of tripods available, and choosing between them can be confusing. Here’s what you need to know:
Fluid-effect pan and tilt: This is suitable for video and for using longer lenses. Though not essential for still photography, it’s quite useful.
People also read: Top 5 Best Canon Lenses for Night Photography 2021 – Buying Guide
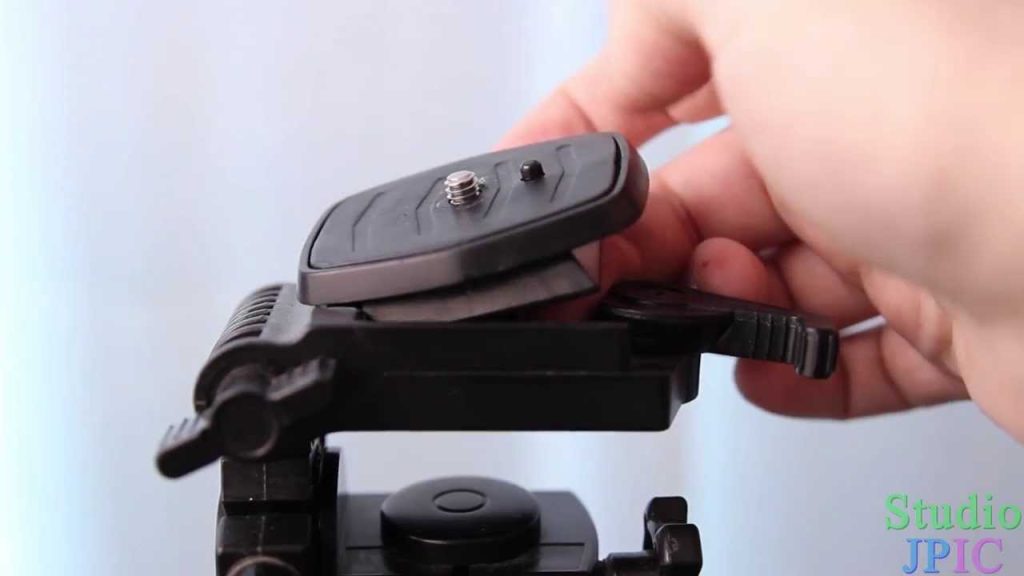
Tripod head: You need to work out which type of camera you’ll be using with the tripod – SLR or compact digital cameras. Most photographers use an adjustable, pan-and-tilt tripod head that sits on top of the tripod legs and enables them to maneuver the camera easily when framing their shot. When choosing a tripod head, there are two considerations:
Arca Swiss compatibility – this standard is used by many high-end manufacturers including Acratech, Arca-Swiss, Kirk, Really Right Stuff, Manfrotto, Markins, etc. If you are buying a new head best bet is to choose one that is Arca Swiss compatible.
How much weight the head can hold – If you are using a large telephoto lens, make sure your tripod’s head can hold the weight of your camera and lens (plus any other accessories).
What to look for when buying a tripod:
1. Sturdiness
Ensure that the tripod you buy is sturdy enough to support your camera and its heaviest lens inside their largest collar-supported position without bowing or flexing in any direction. Tripods with thicker legs tend to be more stable than skinny ones. Internal parts should be made from metal rather than plastic wherever possible – especially if they are being used outdoors where there are extremes of temperature. Metal parts will stand up well to strong sunlight or snow, whereas plastic parts can become quite brittle.
The best tripods are made from carbon fiber which is light yet durable. Carbon fiber also resists breaking in cold weather (unlike metal) and won’t rust or corrode if left out in the rain or immersed in saltwater.
2. Height
Don’t forget to consider how tall you need your tripod to be, too. If you’re short, buy a short tripod; if you’re tall, buy one that extends to eye level when fully extended. You may not always want it at its maximum height though – so check that all the leg extensions collapse down small enough for easy transportation and storage before buying. Bear in mind too that some manufacturers’ minimum recommended height doesn’t take into consideration the addition of their own tripod head which may add another couple of inches.
3. Portability
If you are going to be carrying your tripod around a lot, look for one that’s light but not too flimsy. If it’s really badly made and there is even the slightest wobble when you attach your camera, it will drive you mad! 4. Balance
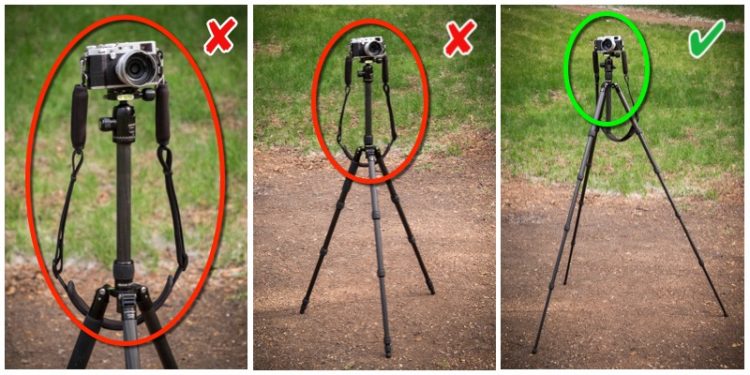
Before buying any tripod, regardless of its design type (unless it is a monopod or tabletop model), try to pick up all sections in one hand to check the weight distribution, then stand back and assess whether all four legs are evenly spaced apart at ground level with no part looking like it might easily topple over forward or backward. Finally, check that the center column is properly aligned and not cocked to one side or the other.
Also, ensure your tripod has a spirit level built in to allow you to check that it is perfectly horizontal when set up.
Tripod legs come in different styles:
1. Twist Lock or Leg Locks: This type of leg lock can be easily adjusted and will lock each section individually without having to tighten the entire tripod at once. They are usually made from aluminum alloy which makes them stable but less rugged than steel legs if they accidentally drop against a hard surface. This type tends to be lighter (than other types) and therefore good for traveling. They also tend to cost less than other types because they are easier and cheaper to manufacture.
2. Lever Lock: This type of tripod leg lock uses a lever and clip system which can require a bit more effort to operate – but they are very quick to adjust and lock once you get used to them. This type of tripod is usually made from sturdier materials such as steel or titanium, making it a favorite among professional photographers who need a rugged tripod that can easily be set up in seconds for capturing fleeting shots. These tripods tend to be heavier than other types due to their use of sturdy leg locks and thick legs, but they do provide greater stability under most conditions including extreme weather.
3. Twist Lock with Anti-Leg Rotation (ALR): This type uses the same twist lock mechanism as the leg locks but without any clips. The legs are always fully extended which means that it is easier to set up quickly, but there is a greater risk of the tripod becoming unstable when using the centre column especially when not at full height. This type usually has rubber or cork grips on each twist lock section for added grip, and may have stiffer leg material in order to provide stability when fully extended.
4. Geared Center Column: Some tripods have a geared center column which allows you to adjust or remove your camera’s position with much more accuracy than just by adjusting it up and down manually even though this type costs slightly more due to higher manufacturing costs in comparison to other types. They tend to be sturdier and more stable than other types, but they are generally heavier because of this extra stability.
5. Reverse or Reversible Legs: This type is a variation on the twist lock leg design which allows each section to flip over once it has been fully extended in order to provide greater ease in transportation. The main advantage with this type is that you don’t have to remove the tripod head before folding it up for storage – you can just reverse all the telescopic sections so that they fold down much flatter into a very small footprint when stored or carried around in your bag or pack. They tend to be slightly less sturdy than standard models, but their lightweight design makes them much easier for travel purposes where and weight are important issues.
6. Carbon Fiber: This is the lightest type of tripod on the market, but it will cost you more than aluminum tripods because carbon fiber is a much stronger material that can be used for thinner leg sections. They are typically manufactured with 8 or 9 cross-section legs which are joined together by removable joints instead of twist locks to further reduce weight and size when using this type of tripod.
The most important thing to consider before buying a tripod is how frequently you expect to use it – if you will only occasionally be taking shots at arm’s length then any ordinary tripod will do just fine, but if you have an interest in photography as a hobby or plan on being actively involved in outdoor activities where it would be impractical to carry around a heavy tripod then it would be better to consider spending more on one that you can take with you or even one that has a built-in monopod function.
![How To Install Ring Floodlight Camera! [Complete Guide 2023]](https://cameraslife.com/wp-content/uploads/2022/10/website-image-4-1-768x402.webp)